Integrating khalti payment gateway | Khalti Webcheckout
In this article we are going to learn integrateing making payment via khalti's latest e-Payment Checkout platform. There are few steps to consider when using the khalti payment gateway integration which we will demistify in this article. Let's start with the practical example, Live_demo and source_code, and docs are available on khalti developer.
First you need to get the secret key form the khalti test merchant panel, here, after you successfully signup and when you are logging in make sure that otp won't show in your actual mail but it is 987654.
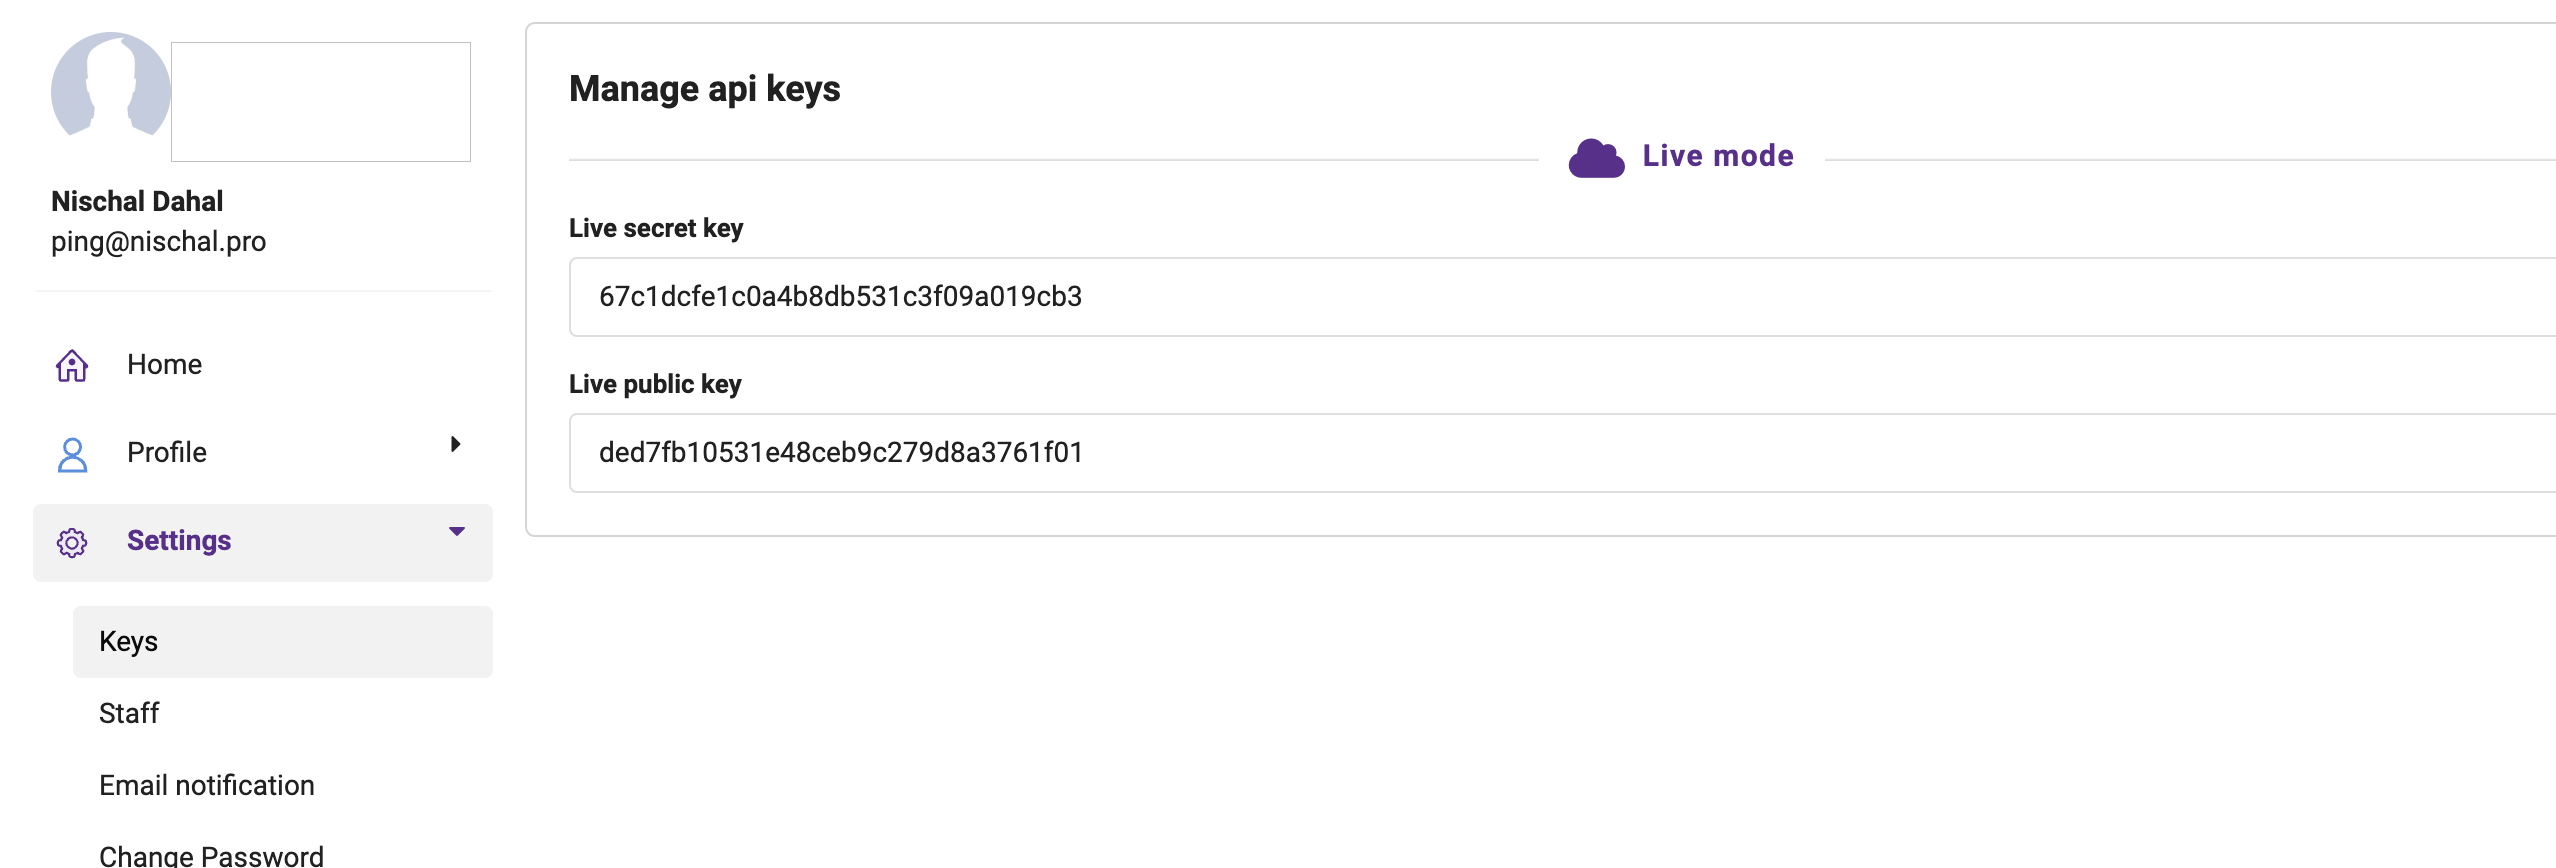
now your secret key is,
const khalti_secret = 'key 67c1dcfe1c0a4b8db531c3f09a019cb3';const live_public_key = 'key ded7fb10531e48ceb9c279d8a3761f01';Khalti Test Credential
Test Khalti ID for 980000000(0-5)
Test MPIN 1111
Test OTP 987654
Setting up Backend
If you also want to implement the esewa integration you can check my previous article.
Here is the step by step how to integrate khalti payment, we will start via importing the required dependencies.
import { Hono } from 'hono';import { Context } from '../context';import axios from 'axios';import { requireUser } from '../middlewares/auth/require_user';import Layout from '../components/layout';import Khalti from '../pages/khalti';import { drizzle } from 'drizzle-orm/d1';import schema from '../drizzle';I also have create some interface for you if you are a typescript lover, make sure you validate them before you use, it can be updated via khalti team in future.
type KhaltiStatus =  | 'Completed'  | 'Pending'  | 'Initiated'  | 'Refunded'  | 'Expired'  | 'User canceled';
export interface KhaltiPaymentResponse {  pidx: string;  total_amount: number;  status: KhaltiStatus;  transaction_id: string | null;  fee: number;  refunded: boolean;}
export interface KhaltiPaymentInitResponse {  pidx: string;  payment_url: string;  expires_at: string;  expires_in: number;  go_link: string;}
export interface KhaltiPaymentLookupResponse {  pidx: string;  total_amount: number;  status: KhaltiStatus;  transaction_id: string | null;  fee: number;  refunded: boolean;}
Import your actual merchant secret key!
const secret_key = 'Key 05bf95cc57244045b8df5fad06748dab';I have initiated the payment before user clicks the pay button, you can do the opposite as well!
const khalti = new Hono();
khalti.get('/', async c => { const url = 'https://api.nischal-dahal.com.np'; const db = drizzle(c.env.DB); const [p1] = await db.select().from(schema.products); const amount_in_paisa = p1.price * 100;
const options = { method: 'POST', url: 'https://a.khalti.com/api/v2/epayment/initiate/', headers: { Authorization: secret_key, 'Content-Type': 'application/json', }, data: { return_url: `${url}/khalti/verify`, website_url: url, amount: amount_in_paisa, purchase_order_id: 'Order01', purchase_order_name: p1.name, customer_info: { name: 'Nischal Dahal', phone: '9800000001', }, }, };
const response = await axios.request<KhaltiPaymentInitResponse>(options); console.log(response.data);
return c.html( <Layout> <Khalti data={response.data} /> </Layout>, );});here, we have create the main route which will render the payment form, and also fetching the single product data from the server and passing it to client, but for in your real world scenario you can fetch the actual order data from your database.
Now, we have imported all the required components.
// Webhook route for payment verificationkhalti.post('/webhook', async c => {  // Handle the webhook when Khalti payment completes  return c.json({ result: 'Payment done' });});
// Handle payment failurekhalti.get('/failure', c =>  c.html(    <Layout>      <h1>Payment Failed</h1>      <p>Please try again</p>    </Layout>,  ),);
This is the webhook route where you can verify the payment, or do bunch of others thing that you like.
// Payment verification routekhalti.get('/verify', async c => {  const pidx = c.req.query('pidx');
  const transaction_id = c.req.query('transaction_id');  const tidx = c.req.query('tidx');  const amount = c.req.query('amount');  const total_amount = c.req.query('total_amount');  const mobile = c.req.query('mobile');  const status = c.req.query('status');  const purchase_order_id = c.req.query('purchase_order_id');
  // demo for getting all useful parameter so that you can save in db
  const lookup = await axios.post<KhaltiPaymentResponse>(    'https://a.khalti.com/api/v2/epayment/lookup/',    {      pidx: pidx,    },    {      headers: {        Authorization: secret_key,        'Content-Type': 'application/json',      },    },  );
  if (lookup.data.status != 'Completed') {    return c.json({ result: 'Payment not completed' });  }
  // create a payment record, save data, update status
  return c.html(    <Layout>      <div>        <h1>Payment {lookup.data.status}</h1>        <pre>{JSON.stringify(lookup.data, null, 2)}</pre>      </div>    </Layout>,  );});
After the user completes the payment, the success response is obtained in the return URL specified during payment initiate. Sample of success response return URL.
- pidx - The initial payment identifier
- status - Status of the transaction
- Completed - Transaction is success
- Pending - Transaction is in pending state, request for lookup API.
- User canceled - Transaction has been canceled by user.
- transaction_id - The transaction identifier at Khalti
- tidx - Same value as transaction id
- amount - Amount paid in paisa
- mobile - Payer KHALTI ID
- purchase_order_id - The initial purchase_order_id provided during payment initiate
- purchase_order_name - The initial purchase_order_name provided during payment initiate
- total_amount - Same value as amount
After a callback is received, You can use the pidx provided earlier, to lookup and reassure the payment status.
khalti.get('/lookup', async c => {  const token = c.req.query('token');
  if (!token) {    return c.json({ result: 'Missing token' });  }
  const response = await axios    .post<KhaltiPaymentLookupResponse>(      'https://a.khalti.com/api/v2/epayment/lookup/',      { pidx: token },      {        headers: { Authorization: secret_key },        'Content-Type': 'application/json',      },    )    .then(response => {      console.log(response.data);      return response.data;    })    .catch(error => {      console.error('Error in Khalti lookup:', error);      return c.json({ result: 'you suck!' });    });
  return c.json({ result: response });});
export default khalti;
How Payment Verification Works
To verify a payment after receiving a callback, you can use the Payment Lookup API by passing the pidx received during the payment initiation.
Payment Verification (Lookup)
Endpoint: POST /epayment/lookup/
You must pass the Authorization header with your Live Secret Key.
Request Payload
{ "pidx": "<pidx_from_initiation>"}Response
{ "pidx": "<pidx_from_initiation>", "total_amount": 1000, "status": "Completed", "transaction_id": "<transaction_id_from_initiation>", "fee": 0, "refunded": false}failure
{ "error_key": "invalid_pidx", "message": "Invalid pidx provided."}Client-Side Implementation
Frontend side, We’ll render the data from the initiated payment and just have
the button to redirect user to payment_url and displaying some minor
information.
// client
export default function Khalti({ data }: { data: KhaltiPaymentInitResponse }) { const url = 'https://api.nischal-dahal.com.np';
return ( <Layout> <div> <h1 className="mb-6 font-bold">Hello, Khalti Web Checkout!</h1> <a href={data.go_link}> <button class={'rounded border bg-purple-800 px-3 py-2 text-white'}> Pay via khalti </button> </a> <pre> {JSON.stringify( { return_url: `${url}/khalti/verify`, website_url: url, amount: 1000, purchase_order_id: 'order1', purchase_order_name: 'Macbook', customer_info: { name: 'Nischal Dahal', phone: '9800000001', }, }, null, 2, )} </pre> </div> </Layout> );}Conclusion
This blog has demonstrated how to integrate the Khalti Webcheckout with a modern stack.